Shopify Tips: Finding icons for your site
Fiona Reevesiconmonstr is an amazing free resource that I highly recommend. It is a searchable and very user friendly repository of icons created by Alexander Kahlkopf, an experienced professional logo designer in Germany.
The logos are made available in both svg and png format and you can simply copy and paste the code necessary to access them from the iconmonstr website. This makes it extremely easy to use the icons in Shopify and my guides often mention iconmonstr if the use of icons is involved - so I thought I'd do a specific post about it and link them all to it.
Using iconmonstr logos in your Shopify theme
After choosing the icon you want at iconmonstr make sure that "SVG" is chosen (instead of "PNG") above the icon. You will probably find it already selected as it is the default at the time of writing. Beneath the icon choose "<> Embed". Make sure "<> Inline" is selected at the top (it is by default) and choose "Copy" beneath the box of code.
Now you have two options for use:
1. If you won't be editing Shopify code to include the icon (e.g. it's in a blog post content), you know you'll only use it once, or you're just feeling lazy(!), then simply paste the code into your HTML wherever you want to use it. (For a blog post that requires clicking on "</>", at the right hand side of the control bar, and pasting it at the relevant location in your text.) You will want to edit the width and height properties to get the icon the size you want (also detailed below).
2. Alternatively, you can create a separate icon file within Shopify so that you can keep it nice and tidy and use it multiple times from different locations consistently (and have the ability to change it to a different icon in the future by editing just one place - better for maintenance). Read on.
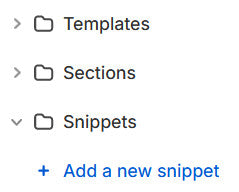
Create your new icon file in Shopify
After navigating to your themes and choosing "Edit code..." go to the "Snippets" area and choose "+ Add a new snippet":
Give your new snippet a relevant filename for the icon it will contain, e.g. if you were creating an icon for a musical note you might call the file:
icon-musical-note.liquid(Note that you would probably just name it 'icon-musical-note' and Shopify will add the '.liquid' itself.)
Paste the icon code you copied from iconmonstr (as already detailed above) into this new file, so that it is the only contents of the file. Note the width and height properties in the code, which will look like this:
width="24" height="24"Change these values to be the correct size for how you are using them on your website. For me this tends to be around size 12, so that might be a good starting point for you to try, and tweak it from there.
Save the file.
Use your new icon in Shopify
To include the contents of your new icon file wherever you want the icon to be displayed in your Shopify store just copy and paste this simple Shopify Liquid code wherever you need it and rememer to change the icon name to whatever you called your icon file:
{%- render 'icon-musical-note' -%}Remember: change 'icon-musical-note' to the name you gave your icon file.
Note: You may need to do some tweaking to the HTML around the inclusion of your icon to get it displaying exactly as you want it in the context of what's surrounding it on your web page, i.e. aligning it properly with what it's next to etc. Believe me, I've had my frustrations fighting with other people's design css getting in my way! That may be the topic of a future blog post with tips to overcome common problems! Leave me a comment if that would be useful for you.
Further reading: iconmonstr Q&A
Found this useful?
If this guide has helped you please leave a comment to let me know :) If it's really helped you, or you're just feeling generous, please consider buying me a coffee via Ko-Fi as a thank you - or buy an item from this website.
If you want to suggest other things you'd like me to write a Shopify guide about please let me know!
icons (7)