Shopify Tips: Add an RSS feed link to your blog
Fiona ReevesAdd an RSS feed icon and link to your Shopify blog(s).
Introduction
Shopify automatically produces an RSS feed for any blogs you host in Shopify, but it depends on what design theme you have chosen whether there is actually a link to it or not on your site. The popular Shopify Dawn theme doesn't seem to include an RSS feed link, so I decided to add one.
Following this guide will take you through adding the icon and link to a main blog page (the page which lists your blog posts), but once you've done that you can do the same to your individual blog posts aswell if you want to (I decided to - you can see my RSS link above).
Create the new RSS icon snippet
After navigating to your themes and choosing "Edit code..." go to the "Snippets" area and choose "+ Add a new snippet":
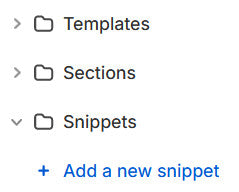
Give your new snippet the filename:
icon-rss.liquid(Note that you will probably just name it 'icon-rss' and Shopify will add the '.liquid' itself.) Then copy and paste the following HTML code (from the left hand panel below) into the file, so that this is the only contents of the file:
See the Pen Shopify: Add RSS icon by Fiona Reeves (@freeves) on CodePen.
If you want to choose from a selection of icons see my blog post on icons.
Save the new file.
Activate your new snippet
At the moment you've created your new RSS icon, but it's not being displayed anywhere yet. You'll need to edit a file in the "Sections" area / folder called:
main-blog.liquidIf, like me, you want your link to appear between the title of your blog and the list of blog posts you'll need to look for the line of code that displays your blog title, which will look like this (at around line 22 in the Shopify Dawn theme):
{{ blog.title | escape }}There will almost certainly be a <> tag of some kind afterwards. You want to place your new link after that section, so it will look something like this when you've finished:
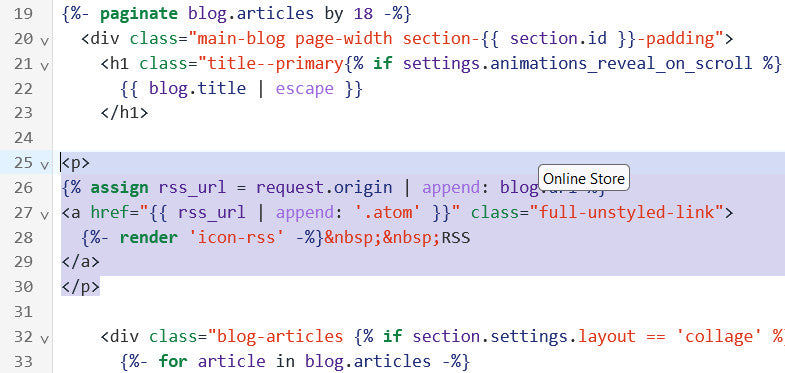
Copy and paste this code where you want the icon link to appear:
<p>
{% assign rss_url = request.origin | append: blog.url %}
<a href="{{ rss_url | append: '.atom' }}" class="full-unstyled-link">
  {%- render 'icon-rss' -%}
</a>
</p>
(Note: If you want the word RSS to appear after the icon, then add it to the end of the line with render 'icon-rss' in it (if the word is too close to the icon, add which is a non-breaking space between them).)
(Note 2: If you are not using the Shopify Dawn theme then you may need to remove or change the bit that says class="full-unstyled-link - I included that so that the word RSS didn't appear underlined etc, but it is specific to the theme I am using, which is version 13 of that theme.)
Save the file. That's it, you're done!
That is, unless you also want to add it to your blog post pages... in which case take a look at the file main-article.liquid (it may have a different name in a different theme) and choose a place to insert the link there. I chose to place it with the existing share link (search the file for the line of code saying {%- when 'share' -%} at around line 75, you'll find the share link immediately following that).
Found this useful?
If this guide has helped you please leave a comment to let me know :) If it's really helped you, or you're just feeling generous, please consider buying me a coffee via Ko-Fi as a thank you - or buy an item from this website.
If you want to suggest other things you'd like me to write a Shopify guide about please let me know!
blog (5) icons (7)
2 comments
This is super helpful, thank you! One question, when I added the RSS button to my blog post pages it appeared on a new line, not right next to the Share button like you have it. What would I need to do to get them both on the same line?
Agh! I feel your pain! It will very much depend on the specific theme design you are using on your site. Having to fight with the css of a design to get things to display correctly is a major frustration of mine! If you still have this problem send me a link to a web page with this on for me to take a look at and I’ll see if I can suggest a solution.