Shopify Tips: Adding previous and next links to blog posts
Fiona ReevesA guide to adding links to the next and previous blog post / article from the one being viewed.
Introduction
Shopify has very limited inbuilt blog functionality, and you are at the mercy of the theme you have chosen how well that limited available functionality is utilised. This guide will tell you how to simply add a link to the next blog post from the one being viewed, and a link to the previous blog post from the one being viewed. The links will include the title of the blog posts. You can see an example at the bottom of this blog post your reading right now!
Choices
You have two choices for where to add your previous and next links: directly in the Shopify theme code itself, or, if it's available to you, by going through the "customize" button and adding a new "custom liquid" block or section to your blog posts page. The Shopify Dawn theme certainly allows the adding of a "custom liquid" code section. Personally I have preferred inserting the code directly in the theme code as I've found I have a bit more control over the spacing of these in relation to the standard link back to the blog. However, if you're more comfortable going through the "customize" route then try that out first - it gives you a preview of how it looks before you decide whether to save it or not.
Where to put the links
If you need help with where to put the links then read on, but if you know where you're putting them and just want the code itself skip to the next section.
If you're using the "customize" route mentioned above simply go to Online Store -> Customize button. Choose your blog post template page from the drop down list, top center of the page, then "Add section" where you want the links to appear. Choose "Custom liquid" and copy and paste the code below into the box.

For editing the theme code directly instead, go to Online Store -> Themes -> [three dots button] -> Edit code. In the Sections area / folder open the file named:
main-article.liquid(Note: I am using the Shopify Dawn theme, if you are using a different theme then the file name might be different - scroll through and see what name makes sense for where your blog posts might be).
If your blog posts have an existing link to return the list of blog posts (e.g. "Back to blog") then look for this and add your next and previous links immediately above or below your existing back to blog link (preferably within the same <div></div> tags as the existing link). For me this was at around line 89. This is what it looked like after adding the highlighted lines of code (you can easily copy and paste the code itself later in this guide).

The links themselves
Here is what you need to copy and paste where you want the links to appear. Each link will only show if there actually is a next or previous blog post to the one being viewed.
See the Pen Shopify liquid next and previous blog post links by Fiona Reeves (@freeves) on CodePen.
You now have next and previous links in place, but they are entirely text ("Next: [blog post title]" and "Previous: [blog post title]". If you'd like to also display an icon at the start of the link, for example an arrow, then continue on - otherwise you're finished!
Optional extra: adding icons to your links
The "Back to blog" link which is part of the Shopify Dawn theme I am using displays an arrow pointing to the left before the word "Back". When adding next and previous links I decided to display an icon for those aswell. I chose a triange pointing left and right so that it wasn't too similar to the arrow already in use. (See the end of this post for how it looks.)
To achieve this, firstly you need to create new files to house your next and previous icons.
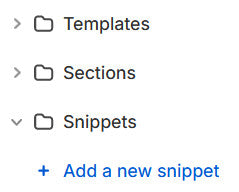
Go to Online Store -> Themes -> [three dots button] -> Edit code. In the "Snippets" area / folder choose "+ Add a new snippet":

Give your new snippet the filename:
icon-next.liquid(Note that you will probably just name it 'icon-next' and Shopify will add the '.liquid' itself. If you already have a file of that name then choose another sensible name e.g. icon-next-blogpost and make sure you refer to this different filename later.)
Then copy and paste the following HTML code into the file, so that this is the only contents of the file:
<svg width="12" height="12" xmlns="http://www.w3.org/2000/svg" viewBox="0 0 24 24">
  <path fill-rule="evenodd" clip-rule="evenodd" d="M3 24l18-12-18-12v24zm16.197-12l-15.197 10.132v-20.263l15.197 10.131"/>
</svg>
Save the file. Now repeat the process for a file called:
icon-previous.liquidThen copy and paste the following HTML code into the file and save.
<svg width="12" height="12" xmlns="http://www.w3.org/2000/svg" viewBox="0 0 24 24">
  <path fill-rule="evenodd" clip-rule="evenodd" d="M21 24l-18-12 18-12v24zm-16.197-12l15.197 10.132v-20.263l-15.197 10.131"/>
</svg>
Note: If you want to choose from a selection of icons see my blog post on icons.
Now your new icons are ready for use, we just need to add them to the next and previous text links. To do that you need to return to where you added those links.
Before the word "Next" insert the following:
{%- render 'icon-next' -%}Before the word "Previous" insert the following:
{%- render 'icon-previous' -%}Save your change. If the icon is too close to the word following it, try adding before the word - it stands for non-breaking space.
Found this useful?
If this guide has helped you please leave a comment to let me know :) If it's really helped you, or you're just feeling generous, please consider buying me a coffee via Ko-Fi as a thank you - or buy an item from this website.
If you want to suggest other things you'd like me to write a Shopify guide about please let me know!
blog (5) icons (7)